Trouble-shooting and Analysis
Calibration and Mount Control Problems
If
you are just starting to use PHD2 or are connecting to new equipment
for the first time, you may have trouble getting the guider calibration
done. This problem usually takes one of two forms, each requiring
different responses:
- The star moves during calibration but
it moves "too far" or "too little." This is usually easy to fix - simply
adjust the 'calibration step-size' parameter in the 'Guiding' tab of Advanced Settings. The help content there describes how this parameter is used, and you should be able to resolve the problem quickly.
- The
star doesn't move enough during the calibration phases of moving in RA,
clearing declination backlash, or moving in Dec. These problems
are announced by alert messages at the top of the display window. Often, the small movements in this
scenario are often the result of seeing deflections and the mount isn't
really moving at all. Dealing with this sort of problem is
described next.
In
nearly all cases, the "no movement" problem is caused by failures in
the hardware or, even more likely, problems in the cabling and
connections. The best tool for trouble-shooting this is the
'Manual Guide' option under the 'Tools' menu, as described in the Tools
section of this help document. Simply use the directional
controls in the 'Manual Guide' window to send commands directly to the
mount while watching a star in the image display window. Use
fairly large guide pulse amounts - at least several seconds - so you
can clearly see that the mount is moving. Try to move the mount
in all four directions and verify the target star is moving by roughly
equal amounts. If the mount does not respond, you know you have
either
hardware or connectivity problems to resolve - nothing to do with PHD2.
If you're using a Shoestring device to connect to the mount,
watch its indicator lights to see if the commands are reaching it.
Similarly, your ST-4 compatible guide camera may have indicator
lights to show when guide commands are being received. If you're
using an ASCOM connection to the mount, be sure the COM port
assignments are correct. You can also use some of the
ASCOM-supplied tools like POTH to be sure the ASCOM driver is
communicating correctly with the mount. It is best to use the
latest version of the ASCOM driver for your mount because older
versions of these drivers often had bugs associated with pulse-guiding.
Calibration Sanity-Checks and Alerts
It
is also possible that the calibration process will complete but PHD2
will post a calibration alert message saying that some of the results
are
questionable. This "sanity check" dialog will show an explanation
of the issue and some details of the calibration results:
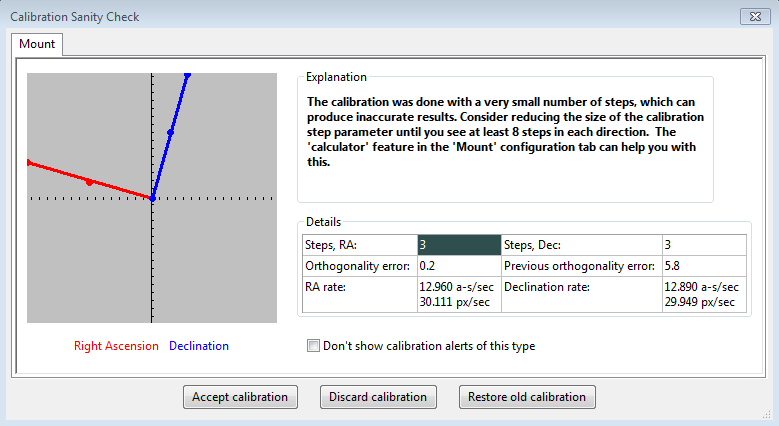
Starting with the 2.4.0 release, there are four things checked by PHD2:
- Too
few steps (shown above) - resolving this issue is quite easy.
Just adjust the calibration step-size downward until you get at
least 8 steps in both the west and north calibrations. If you
used the new profile wizard to set up your configuration, a good
starting value for calibration step-size will already be set. If
you find that the number of steps in RA and Declination is
substantially different, you may be seeing evidence of a problem
with the mount unless you are using different guide speed settings on
the two axes.
- Non-orthogonal
camera axes - the camera axes are normally computed independently even
though they should
be perpendicular. The angle calculations do not require
great precision, but if they are signfiicantly non-orthogonal, you
should repeat the calibration. If you see repetitive alerts of
this type and the axes are significantly non-orthogonal, there is
something wrong with the mount or the cable connections. You
should examine the graph closely to determine what is wrong. In
some cases, the mount may not be moving at all, and the measured
displacements of the star could be caused only by seeing effects.
If the axis error is relatively small and you are convinced the
hardware is working properly, you can avoid further alerts of this type
by setting the
option to 'Assume Dec orthogonal to RA' in the 'Mount' tab of the
Advanced Setup dialog. But you should do this only if the error is
fairly small - otherwise, you are simply ignoring a serious problem.
The graph at the left shows the RA and Dec axis
orientation as measured by PHD2..
- Suspicious
RA and Dec rates - the guide rate for right ascension should be related
to the declination guiding rate by approximately a factor
of cosine (Declination). In other words, the RA rate gets
smaller as you move the scope further away from the celestial equator
(Dec=0). PHD2 won't try to identify
which rate is incorrect - it is simply alerting you that something
looks wrong with the rates. You can sanity check these rates
yourself quite simply. If you are guiding at 1X sidereal rate,
your declination guide rate should be approximately 15 arc-sec/sec;
with a guide rate of 0.5X sidereal, the declination rate would be 7.5
arc-sec/sec,
etc. A declination rate that is significantly smaller than the RA
rate is often an indication of substantial declination backlash.
- Inconsistent results - if the calibration results are
significantly different from your last-used calibration, an alert
message will be generated. This may happen because you've made a
change in your configuration. That doesn't imply a real problem,
but you should probably consider creating a separate profile for the
new configuration. By doing so, PHD2 will remember settings
for each of your profiles, letting you switch between them easily.
If you haven't made a configuration change, you will probably
want to determine why the results are so different.
With
any
of these alerts, the relevant data field will be highlighted based on
the
type of message. You can choose to ignore the warning ('Accept
calibration'), re-run the calibration ('Discard calibration'), or
restore your last good calibration ('Restore old calibration').
With the third option, you can defer calibration until later and
start guiding with your last good calibration data. If you see
repeated alerts on the same topic and are convinced there really
isn't a problem, you can use the 'don't show' checkbox to block
future alerts of that type. But you should be aware that the
sanity-checking used by PHD2 works well for a wide range of equipment,
and most users don't see these calibration alerts at all.
Declination Backlash
One
of the more common sources of calibration problems, assuming the guide
commands are working at all, is excessive backlash in declination.
This is discussed in the Tools and Utilities section, along with options for either fixing or side-stepping the problem.
Validating Basic Mount Control - the Star-Cross Test
If you are having repeated
problems getting calibration to complete without alert messages, you
should run a very simple test to see if the mount is responding to
guide commands. This test basically mimics what is done during
calibration, but it is more direct and can give you a better feel for
what's going on. We'll call it the "star-cross" test. The
idea is to open the shutter on the main imaging camera, then send guide
commands that should cause the stars in the field to trace out a
distinctive cross pattern. In other words, you want to get an
image that looks something like this:
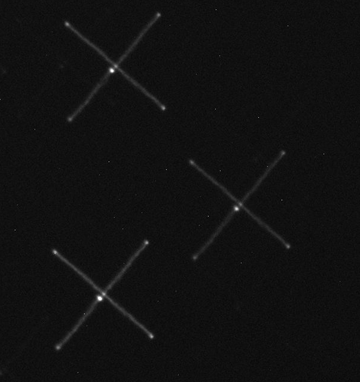
The angular orientation doesn't matter, that's just a function of how you
have the guide camera rotated. What is important is that the
lines in the cross are perpendicular and have roughly equal lengths in
each of the four directions relative to the starting point in the
center. If the image you get doesn't have this approximate
appearance, guiding will either be impaired or perhaps impossible.
For example, consider the following poor result:
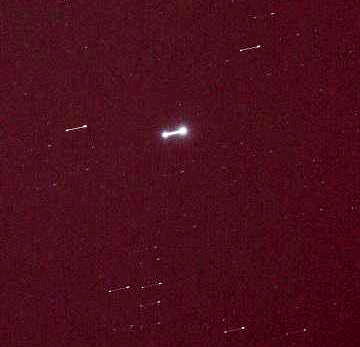
You
can see the star has moved along only one axis - only
in right ascension in this example. The declination guide
commands sent to the mount did nothing at all. Until this is
fixed in the mount, you won't be able to guide in declination at all
and will have to disable declination guiding to even complete a
calibration. There are many other permutations of bad
results, each suggesting a particular problem in the mount, the guide
cable, or much less likely, the ASCOM driver for the mount. You
can safely assume it has nothing to do with PHD2.
Here are the steps for running the test:
- Set the mount guide speed to 1X sidereal. Bring up
the 'Manual Guide' tool in PHD2 and choose an initial pulse size - start with,
say, 5 seconds.
- Start a 60 second exposure on the main camera.
- Send
a 5-second pulse west, then two 5-second pulses east, then a final
5-second pulse west. This should return the star to its
approximate starting position. You should wait about 5
seconds after sending each guide pulse to give the command time to
complete before sending the next pulse.
- Now send a 5 second pulse north, then two 5-second pulses south, then a final
5-second pulse north. This should again return the star to its starting position.
-
Wait for the main camera image to download and see what you get.
You
can use different pulse lengths if you want, perhaps using smaller
values to confirm the mount will respond to them. Just be sure
the total exposure time on the main imaging camera is longer than the
total of guide durations plus a margin for error. On most mounts,
the star will not return to its exact center because of some
declination backlash - you can see that in the first example image. But
it should be fairly close or you'll need to look more carefully at how
much declination backlash you have in the mount.
One benefit to
using this test is that it reduces things to the absolute basics: will
the mount move as directed or not. It has nothing to do with PHD2
guide settings because they aren't involved in the test. You may
find it helpful to use the test results to communicate with the mount
manufacturer or other users who understand that specific mount and its typical problems..
Display Window Problems
New users often complain
that the image displayed in the main window is extremely noisy or is
almost all-white or all-black. Assuming the camera is
functioning and actually downloading images, the display issues are
often caused by the absence of any usable stars in the frame. For
example, trying to test the camera indoors or in daylight will almost always create
these conditions. The appearance of the image display window in
these situations provides no useful information and should be
discounted. PHD2 uses an automatic screen-stretching function
that is intended to help you see real stars under a nightime sky.
When no stars are present, the display will be stretched to show
the range of minimum-to-maximum brightness values of whatever is in the
frame - which is often nothing at all. This is usually what
causes the noisy/all-white/all-black display results. You may
also encounter display problems if the guider is not well-focused.
Focusing the guider can be a tedious and frustrating experience
but it's critical to getting good guiding results. A good
technique is to start with a bright but unsaturated star and try to reach focus with that. Then move to successively fainter stars to fine-tune the focus position. Camera Timeout and Download Problems
In
some cases, you may experience problems where guider images aren't
downloaded or displayed. In extreme cases, this may even cause
PHD2 or other camera-related applications to be non-responsive (i.e. to
"hang"). Again, this is almost always due to hardware, camera
driver, or connectivity issues, with one of the most common
culprits being a faulty USB cable or device. It is highly
unlikely to be caused by an application like PHD2,
so you should begin
your investigation at the lower levels of the system. You can start by
confirming that the guide camera is working - try using a short, direct
cable from the camera to the computer and taking exposures with
the native or test application that came with the camera.
If the
camera is functional, you can start looking at USB
hubs and cables, swapping them one at a time to see if you can isolate
the problem. It's worth remembering that we work in
a hostile
environment while doing our imaging, and many of the components we use
are not designed for cold, outdoor conditions. So something that worked
just last week or last month may no longer be reliable.
Starting
with the 2.3 release, PHD2 uses a camera timeout property to protect
against hang conditions. This property is set in the Camera tab
of Advanced Settings. and uses a default value of 15 seconds. This means that PHD2 will wait up to 15 seconds after the completion of the exposure
to receive the image from the camera. This is a very generous
amount of time and should work well for the majority of cameras.
However, some cameras are known to create problems by
making large bandwith or power demands on the USB subsystem.
If you are getting timeouts of this sort and are convinced the
camera is working properly, you can increase this timeout value. You can even change it to a very
high number - even 1000 seconds or more - so that timeout errors are never shown. Doing so leaves you
vulnerable to apparent hangs in the user interface and erratic guiding
behavior, but it is a choice you can make for yourself. A larger
value for the timeout will not create extra delays during normal camera
operations - once the image is downloaded from the camera, the timer is cancelled and guiding will proceed immediately.Poor Guiding Performance
Once
you've gotten everything running, you will probably get reasonably good
guiding results almost immediately. You will have to decide what
"good enough" means, and everyone's standard is likely to be different.
But if you find your imaging results are not acceptable
because the stars are streaked or elongated, you'll need to take a
systematic approach to correcting the problems. It is often
tempting to just start blindly adjusting the various guide parameters
in an effort to make things better. There is nothing wrong with
adjusting the parameters - that's why they're there - but it should be
done carefully based on an understanding of what they do. The
PHD2 default settings are carefully chosen to produce reasonable
results for most amateur equipment and locations. Optimal
settings are entirely dependent on the image scale, seeing conditions,
and behavior of your specific mount. In other words, they are
unique to your situation - there is no magic "red book" of correct
guiding parameters, and settings you get from other users may be
completely irrelevant to your situation. If you got started by
using the New-Profile wizard, the default settings will already be
tuned somewhat to match your image scale. By using the Guiding
Assistant, you can get more specifics about your situation - how the
seeing conditions look and how you might adjust the minimum-move
settings to avoid chasing the seeing. You can also use either the
Guiding Assistant or the Manual Guiding tool to see how much backlash
is present in your mount, something that can be important to understanding your declination guiding results.
Achieving the best possible guiding performance can be a
complex task and not something that can be covered here. However, you
can get help on the web from a variety of sources, with the document by
Craig Stark being a very good place to start:
http://www.cloudynights.com/page/articles/cat/fishing-for-photons/what-to-do-when-phd-guiding-isnt-push-here-dummy-r2677.Alert Messages
PHD2
will sometimes display alert messages at the top of the main display
window. These generally show error or diagnostic information that
warrant your attention. During normal operation, you probably
won't see any of these, but if you do, this section can help you decide
what to do about them.
Dark-library and Bad-pixel Map Alerts
"Use a Dark Library or a Bad-pixel Map"
- using a dark library or bad-pixel map reduces the likelihood that
PHD2 will mistakenly identify hot pixels or some other image defect as
a star. If you choose to ignore this message, you'll be
vulnerable to situations where PHD2 inadvertently switches from the
guide star to a hot pixel and no longer guides correctly.
Format/geometry mismatches
- dark frames and bad-pixel maps must match the format of the sensor in
the camera being used. If you've changed the camera in an
existing profile, the existing dark/bpm files will not be usable and
you'll see this alert message. To avoid seeing the message,
you should
instead create a new profile when you change cameras. You'll still need
to shoot new darks or bpms, but you can keep the old files for use with
the original camera. In very unusual
circumstances, you may see this message when either the
driver or PHD2 code for handling the camera has changed. You might
also
see a
format-incompatibility alert message if you have an old dark library
that has somehow accumulated frames with different sensor formats.
In
any of these cases, you should rebuild the dark library or bad-pixel
map from scratch - more information can be found here: Dark Frames and Bad-pixel Maps
ASCOM Alerts
When
you first connect to a mount, camera, or other ASCOM-controlled device,
you may see an alert message saying that a required capability is not
supported by the driver. One example would be lack of support for
pulse-guiding by an ASCOM telescope/mount driver, something that can
occur with outdated drivers. In these situations, your only
recourse is to update the ASCOM driver. These drivers are
generally available from the ASCOM web site or, in some cases, from the
device manufacturer. As
a rule, the best practice is to use the latest versions of these
drivers so you don't encounter problems that have already been
identified and fixed.
Camera Timeout Alerts
Alert messages associated with camera timing/timeout problems are discussed above: Camera Timeouts
Calibration Alerts
A number of alerts may appear during the mount calibration process. These are described here: Calibration Alerts
Maximum-Duration Limit Alerts
During
normal guiding, you may see an alert message saying that your settings
for maximum-duration limits in RA or Dec are preventing
PHD2 from keeping the guide star locked. If you've decreased
these parameters from their default values, you should consider
increasing them. However, if the limits are well above one second,
this alert probably indicates you've encountered a mechanical problem
that needs to be corrected. In the simplest cases, you may have
suffered a cable snag, wind gust, mount bump, or other external event
that caused the guide star to move by a large amount. In such
cases, you simply need to correct the problem if you can and proceed
with guiding. But in other cases, the alert may be triggered by a
steadily growing guide star displacement that is not being corrected at all.
For example, if PHD2 can't move the mount correctly in either the
north or south directions, the cumulative uncorrected error will
eventually reach a point that triggers the alert. These sorts of
problems will require careful diagnosis and correction and simply
increasing the maximum-duration limits will not help.
Log Analysis
Any
sort of problem isolation or tuning will invariably require use of
the PHD2 log files. Both are formatted for straightforward
interpretation by a human reader, and the guide log is constructed to
enable easy import into other applications. As mentioned in the
'Tools' section, applications such as PHDLogViewer or Excel
can
be used to visualize overall performance, compute performance
statistics, and examine time periods when guiding was problematic.
With Excel or similar applications, simply specify that the guide
log uses a comma as a column separator.
Guiding Log Contents
The
contents of the guiding log will continue to evolve as new capabilities
are added. But the basic content is stable, and considerable care
is taken to not "break" applications that parse it. If you wish
to analyze the log yourself, the following information will be helpful.
The PHD2 guide log will contain zero or more sequences of
calibration and zero or more sequences of guiding. Each of these sections has a
header that provides most of the information about the guiding algorithms being
used and the internal parameters used by PHD2 for guiding. At the start of either a calibration run or
a guiding sequence, the last line of the header information defines a set of
column headings. The meanings of those
columns are shown below:
Calibration columns:
- dx, dy
are offsets from the starting position, in pixels, in the camera coordinate
system
- x, y are the camera x/y coordinates of the guide
star at the end of each calibration step
- Dist is the total distance moved in the camera
coordinate system (dist = sqrt(dx*dx + dy*dy).
This is the value used by PHD2 to compute the calibration parameters
Guiding columns:
- dx, dy are the same as for calibration - offsets
from the "lock position" of the guide star in the camera coordinate
system
- RARawDistance and DECRawDistance - these are the
transforms of dx and dy into the mount coordinates - in other words, they use
the arbitrary angle of the guide camera to map from X/Y on the camera to RA/Dec
on the mount
- RAGuideDistance and DECGuideDistance - these are
the outputs from the various guiding algorithms. The guide algorithms operate on the
"raw" distances and decide how far, if any, the telescope position
should be adjusted in each axis. For
example, with a "minimum move" parameter set, the "guide"
distances can be zero even when the "raw" distances are non-zero.
- RADuration, RADirection, DECDuration, DECDirection
- these are the values determined by the two "guide" distances
above. The "durations" are the
lengths of the guide pulses, in milliseconds, needed to move the mount by the
distances specified by RAGuideDistance and DECGuideDistance
- XStep, YStep - step-adjustment durations for the
adaptive optics device if one is being used
- StarMass - a brightness measure of the guide
star image
- SNR
- an internal "star-detection ratio" used by PHD2 - essentially a
measure of how well the star can be distinguished from the sky
background
- ErrorCode - an indication that some error
occurred, typically a "guide star faded" error
All distance values are in units of pixels. The header for the guiding section will show
the image scale as it is known by PHD2, and that can be used to scale the pixel
distance values into units of arc-seconds if desired.
Problem Reporting
If
you encounter application problems that are specific to PHD2, you
are encouraged to report them to the open-phd-guiding Google group: https://groups.google.com/forum/?fromgroups=#!forum/open-phd-guiding.
Obviously, the more information you can provide, the more likely
we will be able to resolve the problem. Using the following
guidelines will help in that regard:
- Try to reproduce the
problem - if we have a clear set of steps to follow, we are more likely
to find a solution quickly. If you can reproduce it, try to
reduce things to the minimum number of steps. Remember, we won't
have your hardware or computer environment when we try to reproduce it
ourselves.
- Try to be complete about describing your configuration - operating system, equipment types, PHD2 version, etc.
- Attach
the PHD2
debug log from the session in which you encountered the
problem. You can find the debug log in the PHD2 folder in your
Documents folder. If you can't reproduce the problem, try to
estimate the
time of day when you first saw it - this could help us find evidence in
the debug log without having to sift through hundreds of lines of
output.